DIY Denim Jacket With Studs

Sometimes we buy clothes on a whim and end up not wearing them as much as we thought we would. Especially those clothes that we like but don't fit. We convince ourselves that we will lose weight to wear them, but we do nothing to lose those extra pounds (We're so weak minded). Thankfully, there are DIYs for help.
I bought this jacket because I was in desperate need of a denim one. I bought it thinking it was the "it" item of the season at that time. Nonetheless, I ended up not wearing it as much as I thought I would until I completely forgot about it. But since it's there in the closet, why not personalise it.
This DIY is the simplest that ever exists, but why not share it. the same steps can be followed to personalise other items, like bags, shirts, trousers... and for this DIY, all what is needed is a denim jacket, studs and scissors.
First, remove the sleeves. There are two options to remove them. either by cutting them or by removing the threads and resewing the hems again. It depends on weather you want to have a raw hem (no sewing) or a clean finish.
You can have a clean finish by using scissors, but you have to be very careful while cutting. Make sure that you cut as close as you can to the sown hem without cutting the denim or thread.
Then, add the studs. There is a variety of materials and embellishments that you can add: rhinestones, pearls, studs patches... which can be applied with glue, needle and thread or even a magnetic add on. Whatever you're looking for; you'll find it at your local craft store or online.
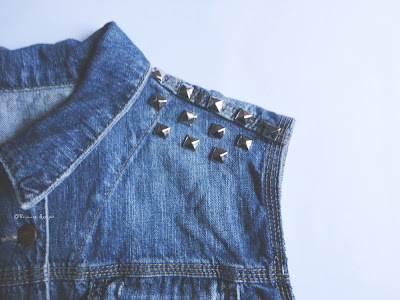
Before gluing or sewing your embellishment of choice (pyramid studs in my case), place them for a visual preview of what the finish product will look like. If you're satisfied then insert them.
The pyramid studs I've chosen are removable, therefore, it was easy to move and place them as I liked.
I highly recommend that you use removable embellishments in case you want your piece of clothing to return to its original style or to personalise it differently another time.
And with this you are done. Congrats for you new crafted item.

I bought this jacket because I was in desperate need of a denim one. I bought it thinking it was the "it" item of the season at that time. Nonetheless, I ended up not wearing it as much as I thought I would until I completely forgot about it. But since it's there in the closet, why not personalise it.
This DIY is the simplest that ever exists, but why not share it. the same steps can be followed to personalise other items, like bags, shirts, trousers... and for this DIY, all what is needed is a denim jacket, studs and scissors.
First, remove the sleeves. There are two options to remove them. either by cutting them or by removing the threads and resewing the hems again. It depends on weather you want to have a raw hem (no sewing) or a clean finish.
You can have a clean finish by using scissors, but you have to be very careful while cutting. Make sure that you cut as close as you can to the sown hem without cutting the denim or thread.
Then, add the studs. There is a variety of materials and embellishments that you can add: rhinestones, pearls, studs patches... which can be applied with glue, needle and thread or even a magnetic add on. Whatever you're looking for; you'll find it at your local craft store or online.
Before gluing or sewing your embellishment of choice (pyramid studs in my case), place them for a visual preview of what the finish product will look like. If you're satisfied then insert them.
The pyramid studs I've chosen are removable, therefore, it was easy to move and place them as I liked.
I highly recommend that you use removable embellishments in case you want your piece of clothing to return to its original style or to personalise it differently another time.
And with this you are done. Congrats for you new crafted item.


Comments
Post a Comment